7/14/2012

[Update]


   I promised you I will report on how the “ice-cream cones” and the “pig-tails” are developing and this post is about them! Those of you who follow me on Facebook have already seen some of them finished a couple of weeks ago.


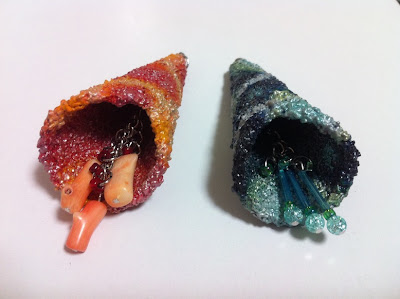
   The cones turned into pendants! Just as I intended from the beginning... well, that`s not right actually. They started their existence as potential earrings, but then I changed my mind... Tell me, would they be successful as earrings? I accept any advise or suggestions that you might have for the color scheme and the additions to the mane shape.


   For these ones I used pieces of chain, jump rings, glass beads with various shape and natural coral beads.

   And here`s a finished pair of "pig-tails":


   Again, I used glass beads and these cute little star-shaped beads, made from some kind of semi-precious stone. I think they came out pretty good. What do you think?

   I`m waiting for inspiration to strike for the finishing of the other two pairs.


   As for now, they are in red and blue base color. Any ideas?

7/12/2012

A "wristwatch"?


   So, we finally got to this box and whats hiding in there!


   Again, as with the money box from the previous post, I used an old tatty watch-box (this time a wooden one). I forgot to take a picture before starting the whole metamorphosis process, but it was pretty old...


... dusty and beat-up. So she decided to bathe in glue to refresh herself and was just coming out of the shower when grounded egg shells were sprinkled all over her! She went to take a shower again but the new layer of glue did nothing but fixate even stronger the miniature pieces. She took a look at herself - actually, it wasn`t that bad... but definitely colorless and lacking individuality.
“If white is so boring, black as an opposite color should be very exiting! Hm... no, far too dark and still lacking personality. Yes, of course! Classic in two colors - no way of going wrong, right? Em... it`s still kind of trivial... it lacks originality and the creative element... It has to be something exiting, alive! In constant movement, developing, even if it`s a frozen one dimensional image. It has to capture the colors of... the Universe!”
It reminded her of colored Easter eggs, that she`d seen somewhere... Now that her hair was done she could think about the outfit* too. But it should be co-ordinated with the occasion and that present that she would carry...


   Mmm... Oh, sorry... I might have drifted off... You haven`t found something more interesting to read in the meantime, have you? Now, where was I...

   The box was pretty beat-up on the outside and completely bared on the inside. For the exterior I used my current favorite “egg-shell”-technique, then I colored it with acrylics. The inspiration for the coloring technique came from my favorite Easter eggs that we tint adding vegetable oil to the egg-paints, once they have a base color on. Pretty cosmic-looking designs coming out with this technique! I thing I managed to recreate the look quite good.


   After that I started working on the interior. I wasn`t sure what to do with it for a long time. It didn`t seem enough to just cover the inside with felt... and I also needed some kind of structure to accommodate the object that it was being made for. So I made a bulge in the middle (using a piece of a toilet-paper roll covered with felt), on which to fixate the wrist-“watch” (???). To cover the inside of the lid I used fabric for the sides and felt for the top and for the container part I did exactly the opposite, draping the fabric over the bulge. It was a pretty fiddly job, but I managed to do it without smudging glue all over the place!


   And this is the thing that the box accommodated!


   Some time ago I made a similar gentleman who, unfortunately, still hasn`t found an application. The second addition to my “Time-men” series (as I decided to call them) I made partly by request, with one condition - to be wearable as a wristlet. So I had to make the actual wristlet too - it took some time to design, because I was wondering how to make the closure, but using three separate pieces of leather and a couple of small strips for the loops, I feel it came out pretty good.


   The curious thing is that the different part and materials that I used to make it had travelled the distance between Bulgaria and Japan twice, even before the finished “watch” take one last trip with final destination somewhere in Bulgaria. As I understand, the recipient is pretty happy with it too, so the project can be considered successful!
   I`m thinking about making more of these... faces and to turn them into “watches”... or something else... Any ideas?

6/23/2012

[Ъпдейт]


   Обещах да докладвам как се развиват “сладоледените фунийки” и “свинските опашки” и тази статия е посветена на тях! Тези от вас, които ме следят във Facebook вече знаят, че част от тях бяха завършени още миналата седмица, и сега ще ми се накарате, че пак закъснявам с обновяването на информацията... Само не ме бийте, моля!

   Конусчетата се превърнаха в колиета! Каквато беше и първоначалната ми идея... ъммм, всъщност това не е съвсем вярно. Започнаха съществуването си като потенциални обици, но после нещо се разубедих... Кажете ми, биха ли били сполучливи обици според вас? Приемам всякакви съвети и предложения за цветовата гама и всякакви добавки към основната конструкция.


   За тези използвах парченца верижка, халкички, стъклени мъниста с различна форма и мъниста от корал.

   Ето и едни завършени “свински опашки”:


   Отново използвах стъклени мъниста и тези малки сладки звездовидни мъниста от някакъв полускъпоценен камък. Много добре се получиха, струва ми се. Вие какво ще кажете? 

   Сега чакам да ме сполети вдъхновението и за останалите два чифта. 


   Засега са в основен червен и син цвят. Идеи?

6/15/2012

"Часовник"?


   И така, стигнахме и до тази кутия и какво се крие в нея!


   Отново, както в случая с касичката от предишния пост, използвах стара изтърбушена кутия от часовник (този път дървена). Забравих да направя снимка преди да започна цялата метаморфоза, но беше доста стара...


... прашна и изстрадала. Затова реши да се окъпе в С200 за освежаване и тъкмо излезе лепкава изпод душа, когато я засипаха с яйчени черупки! Отиде пак да си вземе душ, но новият слой лепило само фиксира още по-здраво миниатюрните парченца. Погледна се - всъщност не беше толкова зле... но определено бледо и безлично. 
“Щом бялото е толкова скучно, черното като противоположност трябва да е сташно вълнуващо! Хм... не, прекалено мрачно и все така безлично. Да, разбира се! Класика в два цвята - няма как да сбъркаш, нали? Ъмм... все пак е някак тривиално... липсва оригиналност, творчество... Трябва да е нещо вълнуващо, живо! В постоянно движение, развиващо се, пък макар и застинало плоско изображение. Трябва да улови цветовете на... Вселената!”
Напомни й за боядисани великденски яйца, които беше виждала някъде... Сега, когато си харесваше прическата, можеше да помисли и за тоалета. Но трябваше да го съобрази с повода и подаръка, който щеше да носи...


   Ммм... А, извинете... нещо се унесох май... Да не сте си намерили по-интересно четиво междувременно? Та, докъде бях стигнала... 
   Кутията беше доста ожулена отвън и напълно оголена отвътре. За външната страна използвах актуалната “яйчена” технология, а след това оцветих с акрилни бои. Вдъхновение за цветовата техника бяха любимите ми великденски яйца, които боядисваме, добавяйки лъжица олио към боите след като вече имат основен цвят. Получават се доста космически картинки! Мисля, че горе-долу успях да пресъздам този вид. 


   След това се заех с интериора. Дълго време се чудех какво точно да направя. Не ми се струваше достатъчно просто да покрия вътрешността с филц... пък и имах нужда от някаква структура, която да “обслужва” предмета, за който беше предназначена. Затова направих издатина в средата (парче руло от тоалетна хартия, покрито с филц), върху която да се застопори “часовника” (???). За тапицирането на капака използвах плат за стените и филц за останалата част, докато в долната част на кутията направих точно обратното, като драпирах плата върху издатината. Беше доста пипкава работа, но за щастие не успях да оклепам всичко в лепило! 


   А ето и какво приюти кутията! 


   Преди време бях измайсторила един подобен господин, който обаче още не е намерил своето приложение. Второто попълнение от поредицата Time-men (както реших да ги нарека) изработих донякъде по поръчка, като условието беше да може да се носи като гривна. Затова трябваше да измайсторя каишка - отне малко време да се проектира, понеже се чудех как да направя закопчалката, но с три отделни парчета кожа и няколко по-малки за гайките се получи доста добре, струва ми се.


   Любопитно е, че различните части и материали, които използвах за изработката, пропътуваха два пъти разстоянието от България до Япония, още преди завършения “часовник” да се отправи на последно пътуване с крайна дестинация ж.к.Надежда. Доколкото разбрах, получателят също е доволен, така че проекта може да бъде обявен за успешен! 
   Имам намерение да изработя още подобни... физиономии, които да се превърнат в “часовници”... или пък нещо друго... Идеи?

The magic of paper and eggshells


   I will tell you what my passion to recycle brought me to. As you can see from the the title of this post, the materials, which inspire me in the last months are paper and eggshell. Why eggshell, you may ask. Well, some time ago I found this video tutorial by a one of the creative persons, who I follow on YouTube, and so I decided to create something, using the same technique. Here is the link to the tutorial in question: http://www.youtube.com/watch?v=qXReU1EAi04&feature=plcp
   As you can probably guess, it wasn’t interesting enough just to copy her work, so I had to think of something original. And when I say original I mean that this is something that I haven’t seen anywhere, not that I`m the only one, who’s came up with the idea. But for the adventure to be even bigger, I decided to apply the “egg” technology to my recycled boxes made from ice-cream lids. Here is what it became:
   These four were my first attempts. The white one is not finished, as you can see, and it combines whole pieces with crushed eggshells. I must admit that I had some technical problems with the boxes. One of them was the edge of the inner wall, onto which the lid lays - it happened to be hard and sharp enough (even though it’s cardboard) to scratch the paint on the inner part of the lid. My dear husband is the only one responsible for the solution of the problem, who managed to defeat heroically my constant “I know better” attitude and convinced me to file the edge in question with the dremel. The idea worked and I went to put my head into the sand… But this, of course, didn’t last long, because it is sometimes impossible to fight some complexes. So I want to ask my better half publicly not to give up on me and to help me, however know-it-all I may think I am on some matters, or trying to sit on my ears when he’s talking!!
   One sub-product of the “ice-cream” boxes are these… swirls. When I was making the inner wall, which actually makes the two lids into a box, I used long double strips of thin cardboard - to long for their purpose, which challenged me to find a usage for the leftover material. So the short tapes were neatly wrapped around a paintbrush (as far as can I remember), until they retained their form, after which they were generously coated with white glue and covered with... crushed eggshells! For the moment I have only put the first layer of paint, so they are far from finished, but I am thinking of making them into earrings.


      (lyrical digression)
I don’t know who and when has invented the polyvinyl-acetate glue, but I `m deeply thankful to that person. It`s like liquid gold for me and my loyal friend, now and forever. And if someone is curious about it, here is how it looks in Japan: 
      (end of lyrical digression)

   After the “pig-tail” swirls I decided to try some other shape and here is what I came up with:


   Circles made of cardboard, and glued into a cornet + glue + eggshells + acrylic paint… - not finished yet, but they are on their way of becoming necklaces. The idea is not entirely clear, but I thing to hang some things inside... we`ll se what comes out.
And this is our “Airplane Tickets Fund” box. 


   I’ve used an old cardboard box, probably from a watch, which I stumbled upon. The clasp is made from leader, which I glued before coating everything with eggshells, and the inside I covered with black felt. I was in hurry to finish it and wasn’t waiting for the inspiration to strike, so there is not much reason in the color scheme, but I guess it’s ok.


And here is the last “ice-cream” box.


   I will explain the exact technology of making it in the next post, because I forgot to document the process. But I intend to make similar ones and take detailed pictures of what I’ve done and how.  What’s interesting is that I began with this idea about a sea, but in the end it rather became a night sky picture.
Well, thats all for now. The topic is far from over, so it will be continued!
Here is a little hint of what’s to come: